
hiredis代码分析一:同步
1、概述
一、概述:
hiredis是 Redis官方用C语言实现的一套编程API。Redis相关组件redis-server、redis-cli、redis-benchmark都分别使用到了该API。
hiredis同时支持同步和异步的方式和Redis进行交互。同步的API定义和实现在hiredis.h和hiredis.c文件中;而异步则在async.h和async.c中。
本系列作为分析hiredis代码的总结笔记,包括三篇文章:
- 1、概要描述
hiredis,相关信息以便从整体上了解该API库的全貌和特性; - 2、对同步API相关信息进行剖析总结;
- 3、对异步API相关信息进行婆媳总结。
本文为这系列的第一篇文章,重点在于从全局上了解hiredis的相关信息。
二、hiredis下载、编译、安装
1、下载:
1 | ```bash |
三、hiredis应用样例;
四、hiredis支持的特性
五、……
Redis官方实现的客户端不多,而hiredis就属于其中一个。Redis内部组件redis-server,redis-client,redis-benchmark都使用了该组件。
hiredis支持同步和异步两种通讯API,分别针对不同的应用场景。
本文尝试通过代码的方式进行分析hiredis同步API的实现原理,以及在日常编程当中,如何使用该组件。
hiredis和Redis的关系本质上是CS结构中的C。它和扮演S角色的Redis之间的通过三种方式进行通讯:
- TCP
- UNIX DOMAIN SOCKET
- USEFD
针对不同方式,分别提供了不同的连接API,供外部程序调用。
本文着重分析TCP这一连接方式,其他两种,后续再根据情况进行分析总结。
基于TCP连接的网络客户端,众所周知,基本上都是经过几个步骤:
- 创建客户端到服务端连接
- 维护连接状态
- 往服务端发送数据
- 接收服务端返回数据
- 连接关闭、资源释放
下面我们不妨根据这个步骤来逐步分析hiredis的应用逻辑。
同步方式较异步方式简单,这些API代码都是集中在hiredis.h和hiredis.c。而测试例子代码在examples/example.c。
直接看实现代码可能一头雾水,我们不妨从测试代码example.c入手。先初步了解下同步API是如何使用。1
2
3
4
5
6
7
8
9
10
11
12
13
14
15
16
17
18
19
20
21
22
23
24
25
26
27
28
29
30
31
32
33
34
35
36
37
38
39
40
41
42
43
44
45
46
47
48
49
50
51
52
53
54
55
56
57
58
59
60
61
62
63
64
65
66
67
68
69
70
71
72
73
74
75
76
77
78
79
80
81
82
83
84
85
86
87
88
89
90
91
92
93
94
95
int main(int argc, char **argv) {
unsigned int j, isunix = 0;
redisContext *c; //定义一个请求上下文
redisReply *reply; //定义一个响应对象,用于保存服务端返回的命令响应
const char *hostname = (argc > 1) ? argv[1] : "127.0.0.1"; //14-26行,命令行参数解析,填充相关变量。
if (argc > 2) {
if (*argv[2] == 'u' || *argv[2] == 'U') {
isunix = 1;
/* in this case, host is the path to the unix socket */
printf("Will connect to unix socket @%s\n", hostname);
}
}
int port = (argc > 2) ? atoi(argv[2]) : 6379;
struct timeval timeout = { 1, 500000 }; // 1.5 seconds
if (isunix) { //连接服务端,根据参数选项,通过不同的方式连接:TCP或者UNIX Domain Socket
c = redisConnectUnixWithTimeout(hostname, timeout);
} else {
c = redisConnectWithTimeout(hostname, port, timeout);
}
if (c == NULL || c->err) { //返回一个对应的上下文,根据上下文结果来判断当前连接是否成功。
if (c) {
printf("Connection error: %s\n", c->errstr);
redisFree(c);
} else {
printf("Connection error: can't allocate redis context\n");
}
exit(1);//连接失败,释放相关资源,退出进程。结束!
}
/* PING server */
reply = redisCommand(c,"PING");//连接成功,发送PING命令。
printf("PING: %s\n", reply->str);//输出PING 命令响应
freeReplyObject(reply);//释放资源
/* Set a key */
reply = redisCommand(c,"SET %s %s", "foo", "hello world"); //发送SET命令
printf("SET: %s\n", reply->str);//输出SET 命令响应
freeReplyObject(reply);//释放资源
/* Set a key using binary safe API */
reply = redisCommand(c,"SET %b %b", "bar", (size_t) 3, "hello", (size_t) 5);
printf("SET (binary API): %s\n", reply->str);
freeReplyObject(reply);
/* Try a GET and two INCR */
reply = redisCommand(c,"GET foo");
printf("GET foo: %s\n", reply->str);
freeReplyObject(reply);
reply = redisCommand(c,"INCR counter");
printf("INCR counter: %lld\n", reply->integer);
freeReplyObject(reply);
/* again ... */
reply = redisCommand(c,"INCR counter");
printf("INCR counter: %lld\n", reply->integer);
freeReplyObject(reply);
/* Create a list of numbers, from 0 to 9 */
reply = redisCommand(c,"DEL mylist");
freeReplyObject(reply);
for (j = 0; j < 10; j++) {
char buf[64];
snprintf(buf,64,"%u",j);
reply = redisCommand(c,"LPUSH mylist element-%s", buf);
freeReplyObject(reply);
}
/* Let's check what we have inside the list */
reply = redisCommand(c,"LRANGE mylist 0 -1");
if (reply->type == REDIS_REPLY_ARRAY) {
for (j = 0; j < reply->elements; j++) {
printf("%u) %s\n", j, reply->element[j]->str);
}
}
freeReplyObject(reply);
/* Disconnects and frees the context */
redisFree(c);
return 0;
}
代码实现的比较简单,但是麻雀虽小五脏俱全,通过样例代码,我们可以基本上可以总结出这些API的应用步骤如下:
- 1、定义一个redisContext请求上下文;
- 2、定义一个保存响应的redisReply;
- 3、连接Redis数据库,hiredis提供了各种连接参数的连接接口,可以根据需求调用其中一个即可;
- 4、连接成功后获取匹配的redisContext,后续利用这个redisContext来发送各种命令;
- 5、结束后,释放相关资源。
结合以上的5个步骤,hiredis具体是如何拆分的,又如何封装的呢?下面我们开始逐步分析这一过程。
2、创建客户端到服务端连接
了解linux下C语言网络编程的人都知道,作为客户端,我们都知道OS API的调用路径为:1
socket()->bind()->connect()->write()->read
其中对于客户端来说bind()非必须的。
可是参考example.c我们并没看到这些原始的API,由此推断hiredis一定是把他们封装起来。
结合example.c和linux下的搜索命令,我们不难得出以下代码序列:1
2
3
4
5
6
7| redisConnectWithTimeout()
|----redisConnectWithOptions()
|--------redisContextConnectBindTcp()
|------------_redisContextConnectTcp()
|----------------socket()
|----------------bind()
|----------------connect()
换成图形大概如下: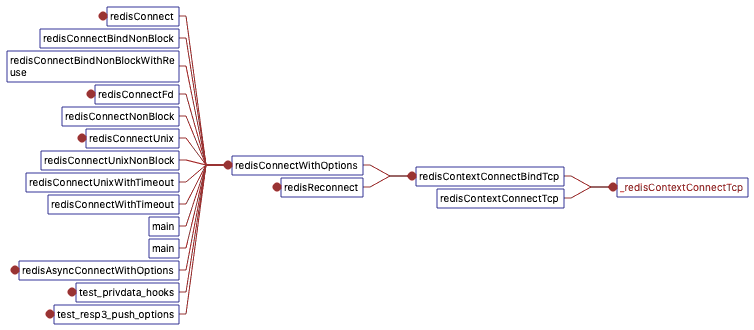
因此得知,整个hiredis到Redis服务器的连接封装逻辑都集中在_redisContextConnectTcp()函数内部。该函数原型如下:1
2
3
4
static int _redisContextConnectTcp(redisContext *c, const char *addr, int port,
                                   const struct timeval *timeout,
                                   const char *source_addr)
其中redisContext *c既是入参也是出参,连接成功相关上下文,通过该参数返回;其他参数都为入参。const char *addr代表服务端的IP地址;int port代表服务端的端口号;const struct timeval *timeout代表连接的超时时间;const char *source_addr表示当前客户端需要绑定的IP地址。函数执行成功返回REDIS_OK,并且通过redisContext c返回连接成功的相关信息;后续利用该上下文和服务端进行通讯、发送指令,接收服务端返回的响应等;执行失败返回REDIS_ERR。
函数代码比较较多,但是只要的逻辑依然是socket()->bind()->connect()这一套路。在此套路主干下,增加一些设置socket属性等功能。详细代码请参考下面内容:1
2
3
4
5
6
7
8
9
10
11
12
13
14
15
16
17
18
19
20
21
22
23
24
25
26
27
28
29
30
31
32
33
34
35
36
37
38
39
40
41
42
43
44
45
46
47
48
49
50
51
52
53
54
55
56
57
58
59
60
61
62
63
64
65
66
67
68
69
70
71
72
73
74
75
76
77
78
79
80
81
82
83
84
85
86
87
88
89
90
91
92
93
94
95
96
97
98
99
100
101
102
103
104
105
106
107
108
109
110
111
112
113
114
115
116
117
118
119
120
121
122
123
124
125
126
127
128
129
130
131
132
133
134
135
136
137
138
139
140
141
142
143
144
145
146
147
148
149
150
151
152
153
154
155
156
157
158
159
160
161
162
163
164
165
166
167
168
169
170
171
172
173
174
175
176//该函数直接封装了socket/bind/connect,当其返回REDIS_OK,则创建好客户端到服务端的一个有效连接,相关连接状态保存在redisContext中
//
static int _redisContextConnectTcp(redisContext *c, const char *addr, int port,
const struct timeval *timeout,
const char *source_addr) {
redisFD s;
int rv, n;
char _port[6]; /* strlen("65535"); */
struct addrinfo hints, *servinfo, *bservinfo, *p, *b;
int blocking = (c->flags & REDIS_BLOCK);
int reuseaddr = (c->flags & REDIS_REUSEADDR);
int reuses = 0;
long timeout_msec = -1;
servinfo = NULL;
c->connection_type = REDIS_CONN_TCP;
c->tcp.port = port;
/* We need to take possession of the passed parameters
* to make them reusable for a reconnect.
* We also carefully check we don't free data we already own,
* as in the case of the reconnect method.
*
* This is a bit ugly, but atleast it works and doesn't leak memory.
**/
if (c->tcp.host != addr) {
hi_free(c->tcp.host);
c->tcp.host = hi_strdup(addr);
if (c->tcp.host == NULL)
goto oom;
}
if (timeout) {
if (redisContextUpdateConnectTimeout(c, timeout) == REDIS_ERR)
goto oom;
} else {
hi_free(c->connect_timeout);
c->connect_timeout = NULL;
}
if (redisContextTimeoutMsec(c, &timeout_msec) != REDIS_OK) {
__redisSetError(c, REDIS_ERR_IO, "Invalid timeout specified");
goto error;
}
if (source_addr == NULL) {
hi_free(c->tcp.source_addr);
c->tcp.source_addr = NULL;
} else if (c->tcp.source_addr != source_addr) {
hi_free(c->tcp.source_addr);
c->tcp.source_addr = hi_strdup(source_addr);
}
/* 先尝试获取IPv4地址信息,如果获取失败,则尝试获取IPv6的地址信息 */
snprintf(_port, 6, "%d", port);
memset(&hints,0,sizeof(hints));
hints.ai_family = AF_INET; //设置协议簇,AF_INET是IPv4,AF_INET6是IPv6,AF_UNSPEC(IPv4和IPv6)
hints.ai_socktype = SOCK_STREAM;//设置返回的SOCKET类型,SOCKET_STREAM数据流协议
/* Try with IPv6 if no IPv4 address was found. We do it in this order since
* in a Redis client you can't afford to test if you have IPv6 connectivity
* as this would add latency to every connect. Otherwise a more sensible
* route could be: Use IPv6 if both addresses are available and there is IPv6
* connectivity. */
if ((rv = getaddrinfo(c->tcp.host,_port,&hints,&servinfo)) != 0) {//getaddrinfo成功返回0,失败非0。'!= 0'表示失败
hints.ai_family = AF_INET6;//修改协议为IPv6再尝试获取
if ((rv = getaddrinfo(addr,_port,&hints,&servinfo)) != 0) {//IPv6 还是失败,函数返回REDIS_ERR
__redisSetError(c,REDIS_ERR_OTHER,gai_strerror(rv));
return REDIS_ERR;
}
}
for (p = servinfo; p != NULL; p = p->ai_next) {//servinfo保存了struct addrinfo 结构体列表,因此需要循环遍历
addrretry:
if ((s = socket(p->ai_family,p->ai_socktype,p->ai_protocol)) == REDIS_INVALID_FD)//socket()失败,继续尝试下一个
continue;
c->fd = s;
if (redisSetBlocking(c,0) != REDIS_OK)//设置该socket非阻塞
goto error;
if (c->tcp.source_addr) {//指定源地址
int bound = 0;
/* Using getaddrinfo saves us from self-determining IPv4 vs IPv6 */
if ((rv = getaddrinfo(c->tcp.source_addr, NULL, &hints, &bservinfo)) != 0) {//失败,直接跳转到error标签代码逻辑:释放资源、返回REDIS_ERR
char buf[128];
snprintf(buf,sizeof(buf),"Can't get addr: %s",gai_strerror(rv));
__redisSetError(c,REDIS_ERR_OTHER,buf);
goto error;
}
if (reuseaddr) {//设置端口REUSE
n = 1;
if (setsockopt(s, SOL_SOCKET, SO_REUSEADDR, (char*) &n,
sizeof(n)) < 0) {
freeaddrinfo(bservinfo);
goto error;
}
}
for (b = bservinfo; b != NULL; b = b->ai_next) {
if (bind(s,b->ai_addr,b->ai_addrlen) != -1) {//绑定IP地址
bound = 1;//只绑定第一成功即可
break;
}
}
freeaddrinfo(bservinfo);//释放资源
if (!bound) {
char buf[128];
snprintf(buf,sizeof(buf),"Can't bind socket: %s",strerror(errno));
__redisSetError(c,REDIS_ERR_OTHER,buf);
goto error;
}
}
/* For repeat connection */
hi_free(c->saddr);
c->saddr = hi_malloc(p->ai_addrlen);
if (c->saddr == NULL)
goto oom;
memcpy(c->saddr, p->ai_addr, p->ai_addrlen);
c->addrlen = p->ai_addrlen;
if (connect(s,p->ai_addr,p->ai_addrlen) == -1) {//利用socket()创建的fd:s连接服务器IP
if (errno == EHOSTUNREACH) {//EHOSTUNREACH:网络不通
redisNetClose(c);
continue; //尝试下一个
} else if (errno == EINPROGRESS) {
if (blocking) {//阻塞socket,则等待
goto wait_for_ready;
}
/* This is ok.
* Note that even when it's in blocking mode, we unset blocking
* for `connect()`
*/
} else if (errno == EADDRNOTAVAIL && reuseaddr) {//网络不可用,但是启动reuse,则重试,注意addrretry是代码重复,还是当前循环,i并没变
if (++reuses >= REDIS_CONNECT_RETRIES) {
goto error;
} else {
redisNetClose(c);
goto addrretry;
}
} else {//其他错误,
wait_for_ready:
if (redisContextWaitReady(c,timeout_msec) != REDIS_OK)
goto error;
if (redisSetTcpNoDelay(c) != REDIS_OK)
goto error;
}
}
if (blocking && redisSetBlocking(c,1) != REDIS_OK)//设置socket为阻塞
goto error;
c->flags |= REDIS_CONNECTED;//修改redisContext状态为connected
rv = REDIS_OK;//设置返回值
goto end;//跳转到end标签逻辑:释放相关资源,返回REDIS_OK,连接的上下文,通过参数redisContext *c返回
}
if (p == NULL) {
char buf[128];
snprintf(buf,sizeof(buf),"Can't create socket: %s",strerror(errno));
__redisSetError(c,REDIS_ERR_OTHER,buf);
goto error;
}
oom:
__redisSetError(c, REDIS_ERR_OOM, "Out of memory");
error:
rv = REDIS_ERR;
end:
if(servinfo) {
freeaddrinfo(servinfo);
}
return rv; // Need to return REDIS_OK if alright
}